Are you looking for a cozy, safe spot for your furry friend right inside your home? Building your own indoor dog kennel can be easier than you think.
Imagine having a special place tailored just for your dog—a space where they feel secure and comfortable. In this guide, you’ll discover simple steps to create a kennel that fits your home and your dog’s needs. Keep reading to find out how you can turn everyday materials into a perfect retreat for your pet, saving money and adding a personal touch that store-bought kennels can’t offer.
Your dog deserves a space as unique as they are, and you’re just a few steps away from making it happen.

Credit: www.humboldt.ca
Choosing The Right Spot
Choosing the right spot for your DIY indoor dog kennel is key to your pet’s comfort and safety. The location affects your dog’s mood, health, and how well they adapt to their new space. A good spot balances space, air flow, and easy access.
Assessing Space Availability
Measure the area carefully to fit the kennel without crowding. Leave enough room for your dog to move freely inside and outside. Avoid tight corners or cluttered places. Think about your dog’s size and activity level. A bigger dog needs more space to stay comfortable.
Considering Temperature And Ventilation
Choose a place that stays cool in summer and warm in winter. Avoid spots near heaters or air conditioners that cause drafts. Proper air flow keeps the area fresh and reduces odors. Windows or vents nearby can help with ventilation but make sure they don’t expose your dog to harsh weather.
Ensuring Safety And Accessibility
Pick a location away from busy walkways and sharp objects. Make sure the spot is easy for you to reach for cleaning and feeding. Check for electrical wires or small objects your dog could chew. The kennel should feel safe and quiet, but not isolated from family activity.
Gathering Materials
Gather wood, nails, screws, and a saw for building the indoor dog kennel. Choose soft, safe materials that suit your dog’s size and comfort. Gather a measuring tape and sandpaper to prepare and finish the pieces smoothly.
Gathering materials is the first step in building your DIY indoor dog kennel. The right materials ensure safety and comfort for your dog. Start by choosing strong and suitable materials for the structure.Selecting Durable Wood Or Plastic
Choose materials that are safe and long-lasting. Wood is a popular choice for many DIYers. It provides a sturdy frame and has a natural look. Ensure the wood is treated to prevent splintering. If you prefer a lighter option, consider plastic. It is easy to clean and water-resistant. Look for high-quality plastic that can withstand wear and tear.Picking Comfortable Bedding
Comfort is key for your pet’s rest. Select bedding that is soft and supportive. Memory foam or padded mats are great options. They provide cushioning and ease joint pressure. Ensure the bedding is washable for easy maintenance. Check for materials that are hypoallergenic to keep your dog healthy.Finding Tools And Fasteners
Having the right tools makes the process smoother. Basic tools like a drill, screwdriver, and saw are essential. For secure assembly, gather screws, nails, and brackets. These will hold the kennel together firmly. Make sure all tools are in good condition to avoid accidents. Proper tools ensure a safe and sturdy construction.Designing The Kennel
Designing your DIY indoor dog kennel means balancing comfort, practicality, and style. You want a space where your dog feels secure and you find easy to maintain. Thoughtful design makes a huge difference in how often you’ll use the kennel and how happy your dog will be inside it.
Measuring For Your Dog’s Size
Start by measuring your dog’s length from nose to tail and height from paw to shoulder. Add a few inches to each measurement to ensure your dog can lie down, turn around, and sit comfortably.
Too small a kennel can cause stress, while too large might feel less cozy. Think about your dog’s growth if they’re still a puppy—will they fit in the kennel six months from now?
Planning For Easy Cleaning
Choose materials that wipe clean easily, like smooth wood or plastic. Avoid fabrics that trap hair and odors unless you plan to wash them often.
Design the kennel with removable or hinged panels. This allows you to reach every corner without hassle, keeping your dog’s space fresh and hygienic.
Consider adding a waterproof liner under bedding to protect the floor and make spot cleaning quicker. How often do you clean your dog’s current space? Think about how you can cut down that time.
Adding Personal Touches
Make the kennel inviting by adding your dog’s favorite blanket or a familiar toy. This helps your dog associate the kennel with comfort and safety.
Paint or decorate the kennel to match your home’s style without using toxic paints. You can even add your dog’s name on a plaque or stencil for a personal feel.
Lighting can play a role too—soft LED lights inside or near the kennel create a warm atmosphere without disturbing your dog’s rest.
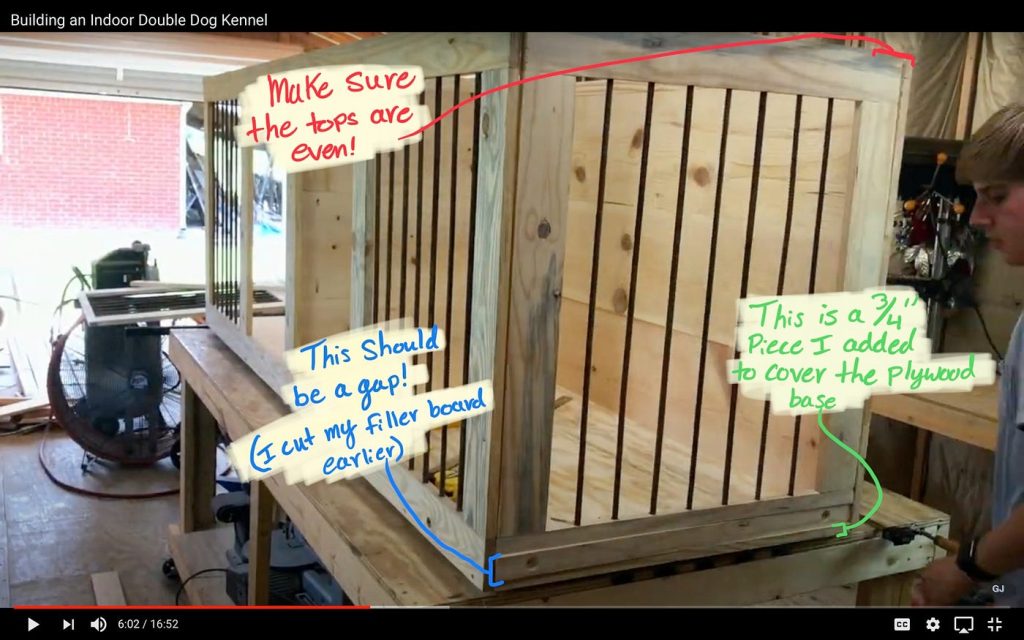
Credit: gagejohnson19.medium.com
Building The Frame
Building the frame is the foundation of your DIY indoor dog kennel. It sets the shape, strength, and stability of the entire structure. Taking your time here ensures your kennel will be safe and comfortable for your furry friend.
Cutting And Assembling Panels
Start by choosing the right wood or plywood panels. Measure your dog’s size carefully to make panels that fit perfectly, giving them enough room to move but not too much empty space. Use a saw to cut the panels precisely; clean, straight cuts make assembly much easier.
Assemble the panels by aligning edges and holding them in place temporarily with clamps. Check that everything fits as planned before securing. This step is like laying the puzzle pieces—you want to be sure before you fix them permanently.
Securing Joints And Supports
Strong joints keep the kennel sturdy. Use wood screws and corner brackets to hold panels together tightly. Avoid nails alone—they can loosen over time and create gaps.
Add vertical supports at each corner and horizontal braces along the sides for extra strength. Think of these supports as the skeleton of your kennel; without them, it won’t hold up well. Have you noticed how a wobbly frame can make the whole kennel unsafe for your dog?
Creating Door Openings
Plan the door size to allow easy access for your dog and yourself. Mark the opening on the panel before cutting to avoid mistakes. Use a jigsaw for smooth, controlled cuts and sand the edges to prevent splinters.
Consider installing a simple latch or hinge system for the door. It should open easily but secure tightly enough to keep your dog safe inside. What kind of door would best suit your dog’s size and your space constraints?
Adding Comfort Features
Adding comfort features to your DIY indoor dog kennel creates a cozy and inviting space for your pet. Comfort is key to helping your dog feel safe and relaxed. Simple touches can make a big difference in your dog’s day-to-day happiness inside the kennel.
Installing Soft Bedding
Choose soft bedding that fits well inside the kennel. Memory foam or plush cushions work great for joint support. Washable covers keep the bedding clean and fresh. Place the bedding on the floor evenly to avoid lumps. Add extra blankets for warmth during colder months.
Incorporating Heating Or Cooling Options
Keep your dog’s temperature comfortable with heating or cooling elements. Use a heated pad for chilly days, but ensure it has an automatic shut-off. For hot weather, consider a small fan or cooling mat. Avoid placing devices too close to your dog. Monitor the temperature regularly for safety.
Including Toys And Accessories
Toys make the kennel a fun, stimulating place. Choose chew toys, puzzle feeders, or soft stuffed animals. Rotate toys regularly to keep your dog interested. Accessories like water bowls and treat dispensers add convenience. Make sure everything is easy to clean and safe for your pet.
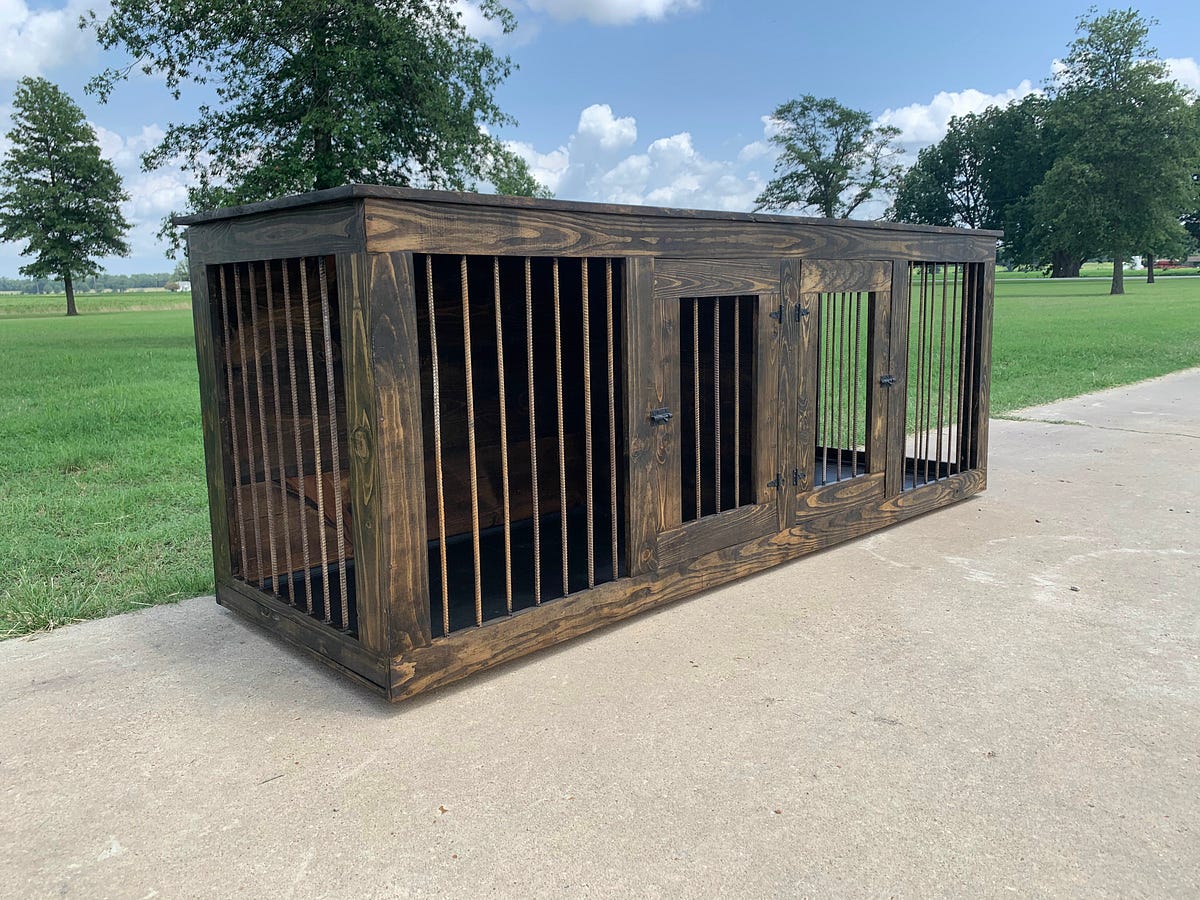
Credit: www.etsy.com
Finishing Touches
Finishing touches make your DIY indoor dog kennel both safe and attractive. These final steps improve the look and protect your dog’s space. Careful attention here ensures comfort and durability.
Sanding And Painting
Sanding smooths rough edges and splinters. Use fine-grit sandpaper to avoid scratches. This step prevents injuries and creates a clean surface for paint.
Choose paint that withstands wear and tear. Apply thin coats for even coverage. Let each coat dry fully before the next one.
Ensuring Non-toxic Materials
Select paints and finishes labeled non-toxic and pet-safe. Avoid strong odors that can bother your dog’s sensitive nose. Natural oils or water-based paints work well.
Check all materials for harmful chemicals. Use untreated wood or sealants designed for pet furniture. Safety is key to keeping your dog healthy.
Testing Stability And Safety
Check the kennel’s stability by gently shaking it. Make sure it does not wobble or tip easily. Tighten screws and reinforce joints as needed.
Look for sharp corners or loose parts. Cover exposed nails and screws with caps or wood filler. Create a secure, cozy spot your dog will love.
Maintaining Your Indoor Kennel
Maintaining your indoor dog kennel keeps it safe and comfortable for your pet. Regular care prevents bad smells and damages. A clean kennel helps your dog stay healthy and happy. Small efforts every day can make a big difference in your dog’s space.
Regular Cleaning Tips
Clean the kennel floor and walls often. Use pet-safe cleaners to avoid harm. Remove food crumbs and hair daily. Wash the kennel with warm water weekly. Dry the area well to stop mold and bacteria.
Checking For Wear And Tear
Look for cracks or sharp edges on the kennel. Check hinges and locks for smooth operation. Fix loose parts quickly to prevent injuries. Inspect plastic or fabric parts for damage. Replace broken pieces to keep the kennel sturdy.
Refreshing Bedding And Accessories
Change bedding regularly to keep it fresh. Wash blankets and cushions with mild detergent. Check toys and bowls for cleanliness and wear. Replace old or torn items to avoid germs. Keep the kennel inviting with clean, soft bedding.
Frequently Asked Questions
What Materials Are Best For A Diy Indoor Dog Kennel?
Use sturdy wood, metal mesh, and non-toxic paint. Ensure materials are safe and easy to clean. Avoid sharp edges to protect your dog.
How Do I Size An Indoor Dog Kennel Correctly?
Measure your dog’s length, height, and width. Add extra space for comfort and movement. A properly sized kennel prevents stress and injury.
Can I Build A Portable Indoor Dog Kennel?
Yes, use lightweight materials like PVC pipes and fabric. Portable kennels are easy to move and store. Ensure stability and proper ventilation.
How Do I Ensure Proper Ventilation In A Diy Kennel?
Incorporate mesh panels or ventilation holes on multiple sides. Good airflow prevents odors and keeps your dog comfortable. Avoid enclosed, stuffy spaces.
Conclusion
Building a DIY indoor dog kennel can be simple and fun. It saves money and fits your space well. Your dog will have a cozy, safe spot inside. Use basic tools and materials you already have. Personalize the kennel to match your home style.
Small efforts create big comfort for your pet. Try it step by step, and enjoy the process. Your dog will love the new space you made. A homemade kennel brings joy to both of you. Give it a try and see the benefits yourself.

Emily Barker is the founder of ChillDogLife.com, a space dedicated to helping pup parents discover the best dog products, lifestyle tips, and cozy ideas for happier homes.
A lifelong dog lover, Emily combines her passion for pets with a knack for research to share trusted recommendations on everything from toys and furniture to health and everyday care.
Her goal is simple: to make life easier, stylish, and more joyful for dogs and the people who love them.