If you love your dog, you want to give them the best toys—ones that are safe, fun, and built to last. Making a rope dog toy yourself is easier than you think, and it can save you money while giving your pet hours of entertainment.
Imagine watching your dog happily chew, tug, and play with a toy you made with your own hands. Keep reading, and you’ll learn simple steps to create a durable rope toy that your furry friend will adore. Your dog’s next favorite toy is just a few knots away!

Credit: www.allwinedesigns.com
Materials Needed
Gathering the right materials is the first step to creating a safe and fun rope dog toy. Choosing quality supplies ensures the toy lasts longer and stays safe for your pet. Focus on durable, non-toxic items that suit your dog’s size and chewing habits.
Choosing The Right Rope
Select a strong, natural fiber rope such as cotton or hemp. These materials are less likely to splinter or harm your dog’s teeth. Avoid ropes with loose threads or synthetic fibers that might unravel easily. Pick a thickness that matches your dog’s size—thicker ropes for bigger dogs, thinner for small breeds.
Additional Tools And Supplies
- Scissors or rope cutters to trim the rope cleanly
- A lighter or matches to seal the rope ends and stop fraying
- Measuring tape to cut the right length
- Optional: Gloves to protect your hands while working

Credit: www.allwinedesigns.com
Preparing The Rope
Preparing the rope is a crucial part of making a durable and safe dog toy. The right preparation ensures the rope won’t fray or come apart quickly, keeping your furry friend entertained longer. Let’s look at how to measure, cut, and secure the rope properly so it’s ready to become a fun toy.
Measuring And Cutting
Start by deciding how big you want the toy to be. A good length is usually between 2 to 3 feet, depending on your dog’s size and chewing strength. Use a tape measure or ruler to get an exact length—this helps avoid wasting rope or making the toy too small to play with.
Cut the rope cleanly with sharp scissors. Dull scissors can leave frayed ends, which might unravel faster. If you don’t have sharp scissors, try using a utility knife on a stable surface to get a neat cut.
Securing The Ends
After cutting, the ends of the rope can quickly unravel. To stop this, you need to secure them right away. One simple way is to tightly wrap each end with strong tape like electrical or duct tape. This keeps the strands together and prevents loose fibers from coming off.
If you prefer a more permanent fix, you can melt the ends slightly using a lighter. Hold the flame close but don’t burn the rope—just enough to fuse the fibers. This method works best with synthetic ropes but avoid it with natural fibers like cotton.
Have you ever noticed how a toy with frayed ends quickly falls apart? Securing the ends well can save you time and money by extending the toy’s life. What method do you think would work best for your rope type and your dog’s chewing habits?
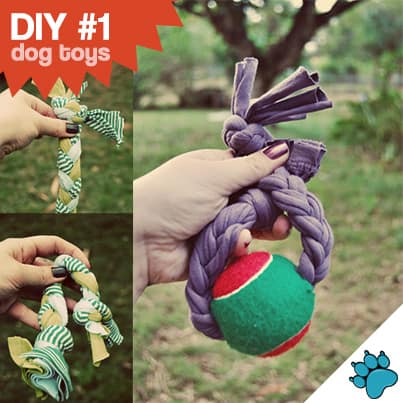
Braiding Techniques
Braiding is a key skill for making a strong and fun rope dog toy. It holds the ropes tightly together, creating a durable toy your dog will enjoy. Different braiding techniques can change the toy’s look and strength. Simple braids work well for beginners. Advanced braids offer more texture and toughness. Both styles make great toys for tugging and chewing.
Simple Three-strand Braid
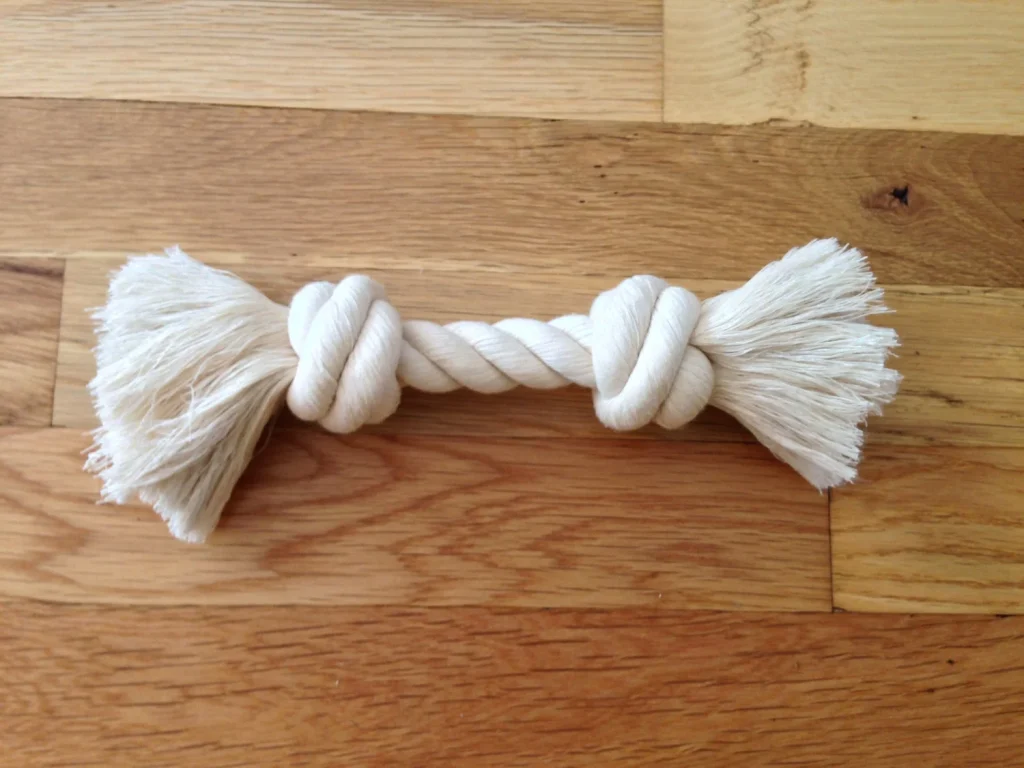
The three-strand braid is easy and quick to make. Start by dividing the rope into three equal parts. Cross the right strand over the middle one. Then cross the left strand over the new middle strand. Repeat this pattern until the braid is the desired length. Tie a strong knot at the end to keep it secure.
- Use soft but strong rope for comfort and durability.
- Keep the strands tight for a firm braid.
- Leave some rope at the ends for easy knots.
This braid creates a classic look. It is perfect for a beginner’s rope toy project.
Advanced Braiding Options
Try braids with more strands for extra strength and interest. Four-strand or five-strand braids add complexity and texture. These braids require weaving strands over and under in patterns. A round braid technique makes the toy thick and strong. Flat braids can also work well for some designs.
- Use multiple ropes or different colors for variety.
- Practice the pattern before starting the toy.
- Finish with tight knots to prevent unraveling.
Advanced braids make toys that last longer. They offer a fun challenge for more confident crafters.
Adding Durability
Adding durability to your rope dog toy is essential to make it last through all the chewing, tugging, and playing. A well-made toy saves you money and keeps your dog safe from swallowing loose threads or broken pieces. Here’s how you can strengthen your toy with simple but effective techniques.
Tightening The Braids
Tight braids hold the rope strands firmly together, preventing them from unraveling quickly. After you braid the rope, pull each strand tight before moving to the next section. This makes the toy tougher and less likely to come apart during play.
Try to keep the tension even throughout the braid. Uneven braids can create weak spots where the rope might break. If you feel any slack, pause and tighten before continuing.
Reinforcing Knots
The knots at the ends of the toy act as anchors to keep the braid intact. Use double or triple knots to give extra strength where the rope ends. Loose knots can slip, causing the entire toy to fall apart unexpectedly.
Wrap the knot tightly and consider adding a dab of non-toxic glue if your dog isn’t allergic. This small step can extend the life of your toy significantly. What’s your experience with knots—have you found certain types that hold better?
Finishing Touches
Finishing touches are what turn a simple rope dog toy into a durable and safe plaything your dog will love. Paying attention to these small details can make a big difference in how long the toy lasts and how enjoyable it is for your pet. Let’s look at how to neatly finish your rope toy and add some personality.
Trimming Excess Rope
After knotting and braiding your rope, you might notice some loose ends sticking out. Trimming these ends carefully helps prevent your dog from chewing on frayed pieces that could unravel the toy.
Use sharp scissors to cut the rope close to the knots but avoid cutting too close, or the knot might come undone. If your rope is made of natural fibers, you can lightly singe the ends with a lighter to seal them. Be cautious with this step—keep the flame brief and your fingers away from the heat.
Have you checked the stability of your knots after trimming? Tug gently on each end to make sure everything stays secure before giving the toy to your dog.
Optional Decorations
Adding decorations can make your rope dog toy more fun and visually appealing. You might tie on a few colorful beads or attach a small bell if your dog enjoys sounds.
Keep safety in mind—avoid small pieces that can be swallowed or sharp objects. Using fabric scraps tied into the knots can add texture and interest without risk.
Think about your dog’s preferences. Does your pup like toys that squeak or toys that are simple and sturdy? Tailoring decorations to their play style can make the toy a favorite quickly.
Credit: pethero.co.za
Safety Tips
Safety is key when making and using a rope dog toy. A well-made toy can still pose risks if not cared for properly. Taking simple safety steps keeps your dog happy and prevents accidents. Always stay alert to signs of wear or damage. Playtime should be fun, not dangerous.
Inspecting The Toy Regularly
Check the rope toy before each use. Look for frayed strands or loose knots. Torn fibers can cause choking or swallowing hazards. Remove the toy immediately if it shows damage. Replace it to avoid your dog chewing unsafe pieces.
Supervised Play Recommendations
Watch your dog closely during play. Rope toys can unravel and create small parts. Supervision helps stop your dog from swallowing unsafe bits. Limit playtime to avoid overuse or stress on the toy. Always keep toys out of reach when not in use.
Benefits Of Diy Rope Toys
Making your own rope dog toy offers more than just a fun craft project. It brings several benefits that can make playtime better for both you and your dog. From saving money to tailoring the toy to your dog’s needs, DIY rope toys are a smart choice for any pet owner.
Cost Savings
Buying dog toys can get expensive, especially if your dog loves to chew and destroy them quickly. Creating a rope toy at home costs only a fraction of store-bought options. You can use old t-shirts, ropes, or fabric scraps you already have, turning trash into treasure.
Think about how many toys you’ve replaced in the past year. Could making your own save you money and reduce waste? This simple switch might stretch your budget while still keeping your dog entertained.
Customization
Every dog has unique play habits and strengths. When you make a rope toy, you control the size, thickness, and texture. This means you can create a toy that perfectly fits your dog's chewing style and mouth size.
Want a thicker rope for a power chewer or a softer one for a gentle player? You decide. You can even add knots in specific spots to challenge your dog or make the toy easier to grip during tug-of-war games.
Encouraging Healthy Play
DIY rope toys encourage active and interactive play, which is essential for your dog’s mental and physical health. Tugging and chewing on a sturdy rope can strengthen your dog’s jaw muscles and help clean their teeth naturally.
Plus, playing together with a homemade toy builds your bond. How often do you get to create something that keeps your dog healthy and happy at the same time? This hands-on approach can make playtime more meaningful for both of you.
Frequently Asked Questions
What Materials Are Needed For A Rope Dog Toy?
To make a rope dog toy, you’ll need cotton rope, scissors, and optional fabric strips for added texture. Cotton rope is durable and safe for dogs. Choose a thick rope to ensure the toy’s longevity. Fabric strips can enhance the toy’s appeal and make it more engaging.
How Do I Start Making A Rope Toy?
Begin by cutting the rope into three equal lengths. Ensure the rope pieces are long enough for braiding. Next, tie a secure knot at one end. This will act as the base. A tight knot prevents unraveling and ensures durability.
Can I Make A Rope Toy Without Knots?
Yes, you can create a knot-free rope toy by braiding the ropes tightly. Start by securing the rope ends together and braid them tightly. This method requires consistent tension throughout. Finish by securing the ends with a fabric wrap or tape to prevent unraveling.
How Can I Personalize The Rope Toy?
Personalize your rope dog toy by incorporating colorful fabric strips or dyeing the rope. Use natural, pet-safe dyes to color the rope. Add fabric strips between the braids for added texture. This customization makes the toy more visually appealing and engaging for your pet.
Conclusion
Making a rope dog toy is simple and fun. You only need a few materials and a little time. This toy can keep your dog busy and happy. It also helps clean their teeth while they play. You can customize the size and colors to suit your pet.
Try making one today and see how much your dog enjoys it. Crafting toys at home saves money and adds a personal touch. Enjoy the process and watch your dog have fun!

Emily Barker is the founder of ChillDogLife.com, a space dedicated to helping pup parents discover the best dog products, lifestyle tips, and cozy ideas for happier homes.
A lifelong dog lover, Emily combines her passion for pets with a knack for research to share trusted recommendations on everything from toys and furniture to health and everyday care.
Her goal is simple: to make life easier, stylish, and more joyful for dogs and the people who love them.