Looking for a fun and affordable way to keep your dog entertained? Making a rope dog toy yourself is easier than you think.
Not only will you save money, but you’ll also create a safe, durable toy that your furry friend will love. Imagine the joy on your dog’s face as they play with something you made just for them. Ready to learn how?
Keep reading, and by the end, you’ll have a simple, step-by-step guide to craft the perfect rope toy for your pup.
Materials Needed
Making a rope dog toy is simple and fun. You only need a few basic materials to get started. Choosing the right supplies helps keep your pet safe and happy.
Below, you will find details about the rope types and extra supplies needed to create a durable toy.
Choosing The Right Rope
Select a rope that is strong and safe for dogs. Natural fibers are best to avoid harmful chemicals. The thickness depends on your dog’s size and chewing habits.
- Cotton rope: soft and safe for dogs
- Hemp rope: very durable and natural
- Manila rope: strong but rough texture
- Avoid nylon or synthetic ropes that may fray
- Choose a diameter of ½ to 1 inch for most dogs
Additional Supplies
You will need a few more tools to finish the toy. These help cut, secure, and clean the rope for safe use.
| Supply | Purpose |
|---|---|
| Scissors | Cut rope to the right length |
| Measuring tape | Measure rope sections accurately |
| Needle and strong thread | Secure rope ends to prevent fraying |
| Non-toxic glue (optional) | Help hold knots tight |
| Rubber bands (optional) | Hold rope parts while tying knots |
Preparing The Rope
Making a rope dog toy starts with choosing the right rope. Preparing it well ensures safety and durability.
This guide covers cutting the rope to size and securing the ends for a strong toy.
Cutting To Size
Measure the rope length based on your dog’s size and chewing habits. Too short may be unsafe, too long can be hard to handle.
- Choose a rope about three times the length you want the finished toy.
- Use sharp scissors or a knife to cut cleanly through the rope.
- Cut the rope straight to avoid fraying during play.
Securing The Ends
Securing the rope ends prevents unraveling and keeps the toy safe for your dog.
| Method | Description | Tools Needed |
|---|---|---|
| Whipping | Wrap thin string tightly around the rope end to bind fibers. | Twine or thread, scissors |
| Melting | Lightly melt synthetic rope ends to fuse fibers. | Lighter or match (use carefully) |
| Taping | Wrap strong tape around the rope tip to hold fibers. | Electrical or duct tape |
Basic Knot Techniques
Knots are important for making a rope dog toy strong and safe. Simple knots can hold the rope tight and prevent it from falling apart.
Learn these basic knots to start making your own durable dog toy with rope.
Overhand Knot
The overhand knot is the simplest knot to tie. It creates a small loop that can stop the rope from unraveling.
- Make a loop with the rope end.
- Pass the end through the loop.
- Pull tight to secure the knot.
Square Knot
The square knot joins two rope ends together. It is strong and lies flat, making it good for dog toys.
- Cross the right rope over the left rope.
- Wrap the right rope under the left rope and pull tight.
- Cross the left rope over the right rope.
- Wrap the left rope under the right rope and pull tight.
Figure Eight Knot
The figure eight knot makes a strong stopper knot. It is easy to untie and adds bulk to the rope end.
| Step | Action |
|---|---|
| 1 | Make a loop in the rope. |
| 2 | Pass the rope end around the standing part. |
| 3 | Bring the end back through the loop. |
| 4 | Pull both ends tight to form the figure eight shape. |
Credit: pethero.co.za
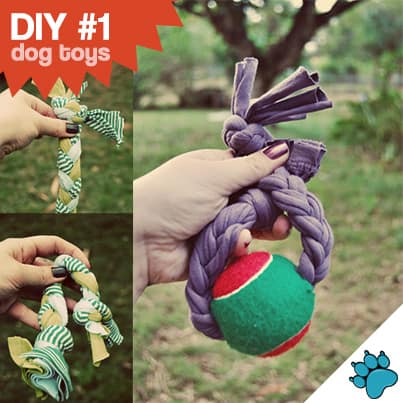
Step-by-step Toy Assembly
Making a rope dog toy is a fun and simple project. You only need a few materials and some patience. This guide will help you build a durable toy your dog will enjoy.
Follow these steps carefully to create a safe and strong toy. Each part adds to the toy’s texture and strength. Let’s start with the core structure.
Creating The Core Structure
Begin by selecting a thick, sturdy rope. Cut the rope into three equal lengths. These will form the base of the toy. Make sure the rope is clean and free from frays.
Tie the three pieces together at one end with a tight knot. This knot will hold the strands firmly. Then, braid the ropes evenly until you reach the other end.
Adding Knots For Texture
Add knots along the braided rope to create texture and grip. These knots make the toy more interesting for your dog. Space the knots evenly for balance and strength.
- Measure about 4 inches from the braid start and tie a knot.
- Move 6 inches further and tie another knot.
- Repeat until you reach the end, leaving a few inches free.
Finishing Touches
Secure the end of the rope with a strong knot to keep everything tight. Trim any loose strands to avoid choking hazards. You can also add a small loop for easy carrying.
| Finish Step | Purpose |
|---|---|
| Tie a strong end knot | Keeps the toy from unraveling |
| Trim loose strands | Prevents choking hazards |
| Add carrying loop | Makes it easy to throw and hold |
Safety Tips
Making a rope dog toy is fun and easy. Safety is very important to keep your dog healthy.
Use safe materials and watch your dog while it plays. Check the toy often for damage.
Choosing Non-toxic Materials
Pick rope made from natural fibers like cotton or hemp. Avoid ropes with dyes or chemicals.
- Use 100% cotton or hemp rope
- Check labels for no added chemicals
- Do not use synthetic or treated ropes
- Choose sturdy, thick ropes to avoid fraying
Inspecting For Wear
Check the toy before each play. Look for loose threads or broken parts. Remove it if damaged.
| What to Check | Why |
| Frayed ends | Can cause choking or swallowing fibers |
| Loose knots | May come apart during play |
| Discoloration | Could mean chemicals or dirt |
| Chewed sections | Weakened and unsafe for use |
Supervised Playtime
Always watch your dog when using the rope toy. Stop play if the toy breaks.
- Stay near your dog during play
- Remove toy if damaged or small pieces appear
- Replace toy regularly to keep it safe
- Teach your dog to play gently with the toy

Credit: www.allwinedesigns.com
Customizing Your Toy
Making a rope dog toy is fun and easy. You can customize it to suit your dog’s preferences.
Learn how to add color, include squeakers, and adjust the size for different dogs.
Adding Color
Bright colors make toys more attractive to dogs. Choose dye-safe materials.
- Use fabric dye for vibrant colors
- Try using colored ropes
- Mix and match different shades
Incorporating Squeakers
Squeakers make toys more engaging for dogs. Place them securely inside the rope.
Here’s a simple way to add a squeaker:
- Cut a small slit in the rope
- Insert the squeaker
- Seal the slit with non-toxic glue
Adjusting Size For Different Dogs
Dogs come in many sizes. Adjust the toy size to fit your dog's needs.
| Dog Size | Rope Length |
| Small | 12 inches |
| Medium | 18 inches |
| Large | 24 inches |
Benefits Of Diy Rope Toys
Making a rope dog toy yourself has many benefits. These toys are fun and safe for your furry friend.
DIY rope toys are not only simple to create but also offer unique advantages. Let’s explore these benefits below.
Cost Savings
Creating your own rope dog toy saves money. You use materials you already have at home.
Store-bought toys can be expensive. DIY toys cost less and are easy to make.
- Use old t-shirts or towels as materials
- Minimal cost compared to store-bought toys
- Simple tools required, like scissors
Bonding Experience
Making a rope toy can strengthen your bond with your dog. It is a fun activity for both of you.
Spend quality time while creating and playing with the toy. Your dog will love the attention and playtime.
- Engages your dog in play
- Increases trust and connection
- Makes your dog feel special
Environmental Impact
DIY rope toys are eco-friendly. You recycle old clothes instead of throwing them away.
Less waste means a cleaner environment. Making toys at home reduces packaging waste from store-bought toys.
- Reduces textile waste
- Decreases need for new materials
- Promotes sustainable living

Credit: www.allwinedesigns.com
Frequently Asked Questions
What Materials Are Needed To Make A Rope Dog Toy?
You need durable cotton rope, scissors, and optionally, a lighter to seal ends. Choose pet-safe, strong materials to ensure safety and longevity of the toy.
How Do I Braid A Rope Dog Toy Properly?
Cut three equal rope strands, knot one end, and braid tightly. Secure the other end with a knot to keep the braid intact and safe for play.
Can I Customize The Size Of The Rope Dog Toy?
Yes, adjust rope length based on your dog’s size and chewing habits. Larger dogs need thicker, longer toys; smaller dogs prefer shorter, thinner ones.
Is Making A Rope Dog Toy Safe For Puppies?
Yes, using soft, non-toxic rope is safe for puppies. Always supervise playtime to prevent swallowing or choking hazards from loose strands.
Conclusion
Making a rope dog toy is simple and fun. It saves money and keeps your dog happy. You only need a few supplies and a little time. This toy is strong and safe for chewing. Try different knot styles to find what your dog loves.
Enjoy the bond you build while creating and playing together. Homemade toys bring joy to both you and your pet. Give it a try and see the fun grow!

Emily Barker is the founder of ChillDogLife.com, a space dedicated to helping pup parents discover the best dog products, lifestyle tips, and cozy ideas for happier homes.
A lifelong dog lover, Emily combines her passion for pets with a knack for research to share trusted recommendations on everything from toys and furniture to health and everyday care.
Her goal is simple: to make life easier, stylish, and more joyful for dogs and the people who love them.