Are you looking for a fun way to keep your dog active and sharp? Building your own dog agility equipment could be the perfect solution.
Not only will you save money, but you’ll also create a personalized course that suits your dog’s size and skill level. Imagine the joy of watching your dog jump, weave, and run through obstacles you made with your own hands.
You’ll discover easy and affordable DIY ideas that will turn your backyard into an exciting playground for your furry friend. Ready to get started? Let’s dive in!
Benefits Of Diy Dog Agility Gear
Building your own dog agility gear offers more than just a set of obstacles—it creates a unique experience for both you and your furry friend. The benefits go beyond saving money; you get to tailor every piece to your dog’s specific abilities and preferences. Plus, the process of making the equipment together strengthens your bond in ways store-bought gear simply can’t match.
Cost Savings Compared To Store-bought
Buying agility equipment can quickly become expensive, especially if you want a full course. DIY gear lets you control expenses by using affordable materials like PVC pipes, wood, and household items. You can create high-quality equipment at a fraction of the price without sacrificing safety or durability.
Have you ever considered how many agility tools you really need? Starting with just a few homemade pieces can keep costs low while still offering a fun training experience.
Customizing For Your Dog’s Needs
Every dog has different strengths and challenges. When you build your own gear, you can adjust heights, widths, and difficulty levels to match your dog’s size and skill. This personalized approach can help avoid frustration or injury and keeps training sessions enjoyable.
Think about your dog’s favorite moves and what might motivate them most. You might add extra tunnels for a curious pup or wider jumps for a confident jumper. Custom equipment means you’re always training on terms that work best for your companion.
Bonding Through Building Together
Working on DIY agility gear isn’t just a solo project—it’s a shared journey. As you build, you’re investing time and care that your dog senses. This effort can deepen your connection and improve communication during training.
Imagine watching your dog excitedly explore an obstacle you created with your own hands. That moment can turn routine practice into a rewarding experience for both of you. How could this hands-on involvement change your training routine?
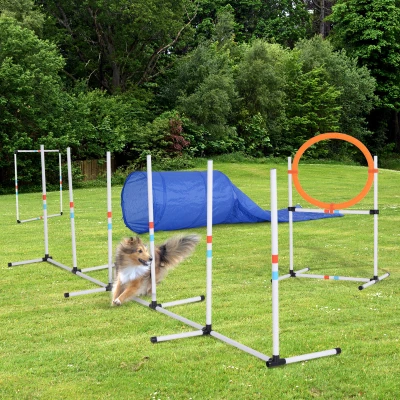
Credit: www.aosom.ca
Essential Agility Equipment To Build
Building your own dog agility equipment can be rewarding and fun. It allows you to customize the setup to fit your space and your dog’s abilities. Focusing on essential equipment helps you create a versatile course that challenges your dog while keeping training enjoyable.
Jumps And Hurdles
Jumps are the backbone of any agility course. You can make simple hurdles using PVC pipes or wooden dowels supported by adjustable stands. This lets you change the height as your dog improves.
Try adding wings on the sides to guide your dog and make the jump look more official. Have you considered how adjusting jump heights can help build your dog’s confidence and technique?
Tunnels And Tents
Tunnels add excitement and test your dog’s speed and courage. You can create collapsible tunnels using flexible tubing or fabric stretched over hoops. Tents or fabric covers offer shaded rest spots and simulate real agility obstacles.
Think about using lightweight materials that are easy to move and store. This way, you can rearrange your course frequently, keeping your dog curious and engaged.
Weave Poles
Weave poles develop your dog’s agility and precision. Use sturdy PVC pipes spaced evenly and secured firmly in the ground or weighted bases. Ensure poles are tall enough and spaced about 18 to 24 inches apart.
Practice patience as weaving takes time to master. Can you commit to short, consistent training sessions to help your dog learn this skill step by step?
Pause Boxes And Platforms
Pause boxes teach your dog control and obedience by requiring them to stop and stay on command. Build a simple platform with non-slip materials like rubber mats or textured wood. Size it just big enough for your dog to stand or sit comfortably.
Adding height variation challenges balance and focus. How might incorporating these pauses improve your dog’s overall discipline during agility runs?
Materials And Tools Needed
Building your own dog agility equipment requires the right materials and tools. Choosing safe and affordable items ensures your dog enjoys training without risk. The tools must be simple to handle for smooth construction. Safety should always be a top priority during the build and use of the equipment.
Affordable And Safe Materials
Use materials that are easy to find and budget-friendly. PVC pipes work well for jumps and tunnels. They are light, durable, and safe for dogs. Wooden planks can create ramps and platforms but must be smooth to avoid splinters. Non-toxic paint or sealant helps protect wood and adds color. Avoid sharp edges or heavy metals that could harm your dog.
Basic Tools For Construction
- Hand saw or PVC cutter for cutting pipes and wood.
- Drill with bits for making holes.
- Screwdriver or power driver for fastening screws.
- Measuring tape for accurate sizing.
- Sandpaper to smooth rough edges.
- Clamps to hold parts steady while working.
Safety Considerations
Check all materials for sharp points or splinters. Sand rough surfaces thoroughly to prevent injuries. Use sturdy joints to avoid equipment collapse during use. Test each piece before letting your dog try it. Keep the area clean and dry to stop slips and falls. Always supervise your dog during practice sessions.

Credit: www.therulybully.com
Step-by-step Diy Equipment Guides
Creating your own dog agility equipment can be both fun and rewarding. It allows you to tailor each piece specifically for your dog’s size and skill level. Let’s break down how you can build some essential agility tools right at home, using simple materials and clear instructions.
Building A Simple Jump
Start with two sturdy posts about 3 feet tall. Use PVC pipes or wooden dowels for the crossbar. The key is to make the bar easily adjustable in height to match your dog’s ability.
- Secure the posts firmly in the ground or weighted bases.
- Drill holes at different heights on the posts to hold the crossbar.
- Use clips or hooks to place the bar so it can be moved up or down quickly.
Have you noticed how your dog’s confidence grows when they clear each jump? Adjust the height gradually to keep the challenge just right.
Crafting A Tunnel
A tunnel can be made from flexible, durable materials like collapsible play tunnels or flexible tubing. Choose a length that fits your available space but offers a good run for your dog.
- Anchor the tunnel ends to prevent slipping during runs.
- Ensure the tunnel is wide enough for your dog to run through comfortably.
- Use stakes or sandbags to keep the tunnel in place if outdoors.
When I first introduced a tunnel to my dog, patience was key. Start by encouraging your dog to enter the tunnel with treats and praise to build positive associations.
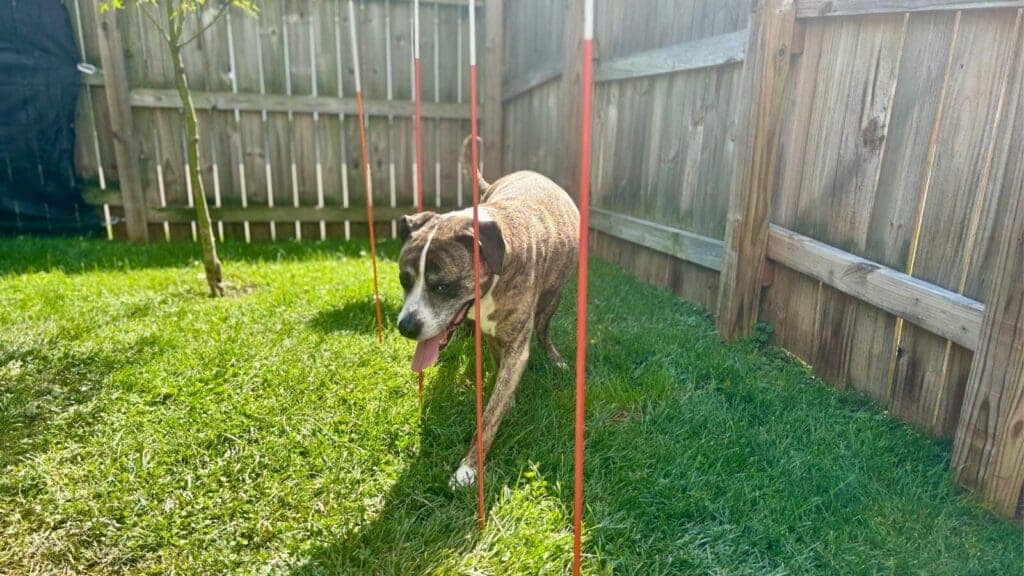
Setting Up Weave Poles
Weave poles require evenly spaced vertical poles that your dog can zigzag through. Use PVC pipes around 4 to 5 feet tall for durability and ease of handling.
- Space poles about 18 to 24 inches apart, depending on your dog’s size.
- Secure poles in a straight line using a wooden base or ground stakes.
- Mark the base for consistent spacing and easy setup.
Consider how your dog’s stride fits the spacing. Adjust the distance if your dog struggles to weave smoothly.
Making A Pause Box
A pause box encourages your dog to stop and stay for a moment during the agility course. Use plywood or sturdy plastic to create a square platform about 3 feet by 3 feet.
- Ensure the surface is non-slip by adding grip tape or rubber mats.
- Build it low to the ground for easy access.
- Make the edges smooth to avoid injury.
Teaching your dog to pause here can improve focus and control. Use treats and a clear command to reinforce this behavior.
Training Tips Using Diy Equipment
Training your dog with DIY agility equipment can be fun and rewarding. It builds trust and sharpens your dog’s skills. Careful planning helps your dog feel safe and eager to learn.
Introducing Equipment Gradually
Start with one piece of equipment at a time. Let your dog explore it without pressure. Use treats or toys to encourage curiosity. Short sessions work best to keep your dog interested. Repeat often to build confidence. Avoid forcing your dog on unfamiliar equipment.
Positive Reinforcement Techniques
Use praise and treats to reward good behavior. Celebrate small successes to motivate your dog. Keep training upbeat and cheerful. Avoid punishment or harsh words. Positive vibes help your dog enjoy learning. Consistent rewards build strong habits.
Adjusting Difficulty Levels
Begin with simple tasks that your dog can do easily. Increase challenges step-by-step as your dog improves. Change heights, distances, or speeds to keep training fresh. Watch your dog’s reactions to avoid stress. Adjust based on your dog’s comfort and skill. This keeps training fun and effective.
Maintaining And Storing Your Gear
Maintaining and storing your DIY dog agility equipment properly extends its life and keeps your furry friend safe during every training session. Neglecting this part can lead to unexpected breaks or accidents, which no dog owner wants. Let’s dive into simple ways you can keep your gear in top shape and organized.
Regular Inspection For Safety
Check your equipment before each use. Look for cracks, loose screws, or worn-out parts that could cause injury. A quick hands-on inspection helps you catch problems early.
Pay special attention to joints and moving parts, like hinges or clips. If you spot any weakness, fix or replace the part immediately. Have you ever noticed a wobbling jump bar and thought it was okay to use? That’s a risk waiting to happen.
Cleaning And Repairs
Dirt and mud don’t just look messy; they can wear down your equipment faster. Wipe down surfaces with a damp cloth after every session. For tougher grime, mild soap and water work well.
Keep a small repair kit handy with items like sandpaper, super glue, and extra screws. Fix minor damages right away to avoid bigger repairs later. Remember, a small tear in a fabric tunnel can quickly turn into a full rip if not addressed.
Space-saving Storage Ideas
Agility gear can take up a lot of space, but smart storage saves room and protects your equipment. Use wall hooks or pegboards to hang poles and hoops vertically.
- Stack tunnels neatly in a corner.
- Store smaller items like cones and weave poles in labeled bins.
- Consider collapsible or foldable designs to reduce bulk.
Have you tried clearing a spot in your garage or backyard shed for your gear? A dedicated space helps you stay organized and makes setting up faster.
Inspiring Diy Agility Projects
Building your own dog agility equipment can be a fun and rewarding project. It lets you customize the gear to fit your dog's size and skill level. Many DIY projects use simple, affordable materials. These projects inspire creativity and provide exercise for both you and your dog.
Crafting agility equipment at home also saves money. It turns ordinary items into exciting obstacles. Plus, it gives you the chance to bond with your pet during training sessions.
Creative Upcycling Ideas
Old furniture and scrap wood can become useful agility tools. For example, a sturdy wooden pallet transforms into a balance beam. Empty plastic barrels make excellent weave poles or tunnels.
Paint and decorate these items to make them safe and fun. Upcycling reduces waste and creates unique obstacles your dog will love.
Using Household Items
Simple items at home can serve as agility equipment. Chairs and broomsticks create jump bars. Cardboard boxes turn into tunnels or platforms.
Use cushions for soft landing pads or stepping stones. Household items make training accessible and easy to adapt.
Community Sharing And Resources
Local groups often share ideas and materials for DIY projects. Online forums and social media provide plans and tips. Community swaps can help you find free or low-cost equipment parts.
Joining a group builds support and motivation. Sharing your projects inspires others and improves your skills.
Credit: www.therulybully.com
Frequently Asked Questions
What Materials Are Best For Diy Dog Agility Equipment?
PVC pipes, wood, and sturdy plastic are ideal materials. They are durable, lightweight, and safe for dogs. These materials are easy to work with and cost-effective for building jumps, tunnels, and weave poles.
How Do I Ensure Dog Safety In Agility Equipment?
Use non-slip surfaces and smooth edges to prevent injuries. Avoid toxic paints or finishes. Make sure all parts are stable and secure to support your dog’s weight during training.
Can I Customize Agility Equipment For Different Dog Sizes?
Yes, you can adjust height and width easily. Customize jumps and tunnels based on your dog’s breed and skill level. This helps in safe and effective agility training.
How Much Space Do I Need For A Diy Agility Course?
A minimum of 20×30 feet is recommended for a basic course. This allows room for jumps, tunnels, and weave poles. Larger spaces provide more flexibility for advanced training setups.
Conclusion
Creating your own dog agility equipment can be rewarding. It saves money. It strengthens the bond with your dog. Plus, it’s fun. You can customize the equipment to suit your dog’s needs. Simple items often work best. PVC pipes, tires, and cones are great choices.
Start small. Gradually add complexity as confidence grows. Your dog will love the challenge. Training together improves their agility and health. Enjoy the journey with your furry friend. Building, training, and playing bring joy. Both you and your dog will benefit greatly.
Happy building! Happy training!

Emily Barker is the founder of ChillDogLife.com, a space dedicated to helping pup parents discover the best dog products, lifestyle tips, and cozy ideas for happier homes.
A lifelong dog lover, Emily combines her passion for pets with a knack for research to share trusted recommendations on everything from toys and furniture to health and everyday care.
Her goal is simple: to make life easier, stylish, and more joyful for dogs and the people who love them.