Taking apart your dog crate might seem tricky, but it doesn’t have to be. Whether you’re moving to a new home, cleaning every corner, or simply storing it away, knowing the right steps can save you time and frustration.
You want the process to be quick and easy, without risking damage to your crate or hurting yourself. In this guide, you’ll discover simple, clear instructions to take apart your dog crate safely and efficiently. Keep reading, and you’ll have your crate disassembled in no time.
Tools Needed
Taking apart a dog crate can seem tricky if you don’t have the right tools at hand. Having the proper equipment not only makes the process faster but also protects your crate from damage. Before you start, gather these essential tools to make your task smooth and efficient.
Basic Hand Tools
Most dog crates are held together with screws, bolts, or clips, so having a set of basic hand tools is a must. A screwdriver—both flathead and Phillips—will help you remove screws easily. Sometimes, a wrench or pliers might be necessary to loosen bolts or stubborn clips.
Protective Gear
Safety should never be overlooked. Wearing gloves can protect your hands from sharp edges or pinches while handling metal parts. Eye protection is also a smart idea, especially if you need to pry or twist components apart.
Optional Power Tools
If your crate is secured with many screws or bolts, a cordless drill with screwdriver bits can save you time and effort. However, be cautious not to overtighten or strip screws when reassembling. Power tools are great helpers, but only use them if you feel comfortable and experienced.
Additional Helpful Items
- Zip ties or small containers:To keep screws and bolts organized during disassembly.
- Soft cloth or towel:To place under the crate and avoid scratches on floors.
- Flashlight:If you’re working in a dim area, it helps to see all the connectors clearly.
Have you ever started taking something apart only to realize you were missing a key tool? It’s frustrating, right? Gathering everything you need before you begin saves time and stress, making your project far more enjoyable.
Credit: www.forbes.com
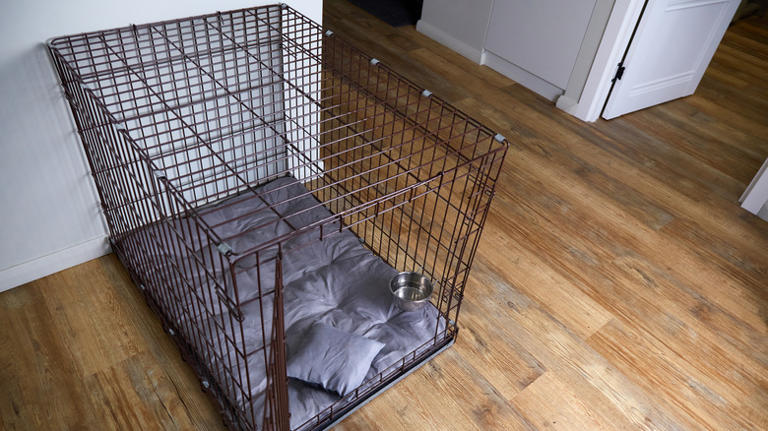
Prepare The Crate
Getting your dog crate ready for disassembly is more important than you might think. It sets the stage for a smooth and hassle-free process. Taking a few moments to prepare can save you frustration and even prevent damage to the crate or its parts.
Clear The Interior
Start by removing everything inside the crate. This includes blankets, toys, food bowls, or any bedding your dog uses. Leaving items inside can make the crate heavier and harder to handle.
Think about how a cluttered interior might make it difficult to see what you’re doing when taking the crate apart. Clearing it out helps you work faster and more safely.
Remove Accessories
Next, detach any accessories attached to the crate. This might be water bottles, clip-on bowls, or divider panels. These parts can get in the way or break if left on during disassembly.
Keep the removed accessories in a safe spot so you don’t lose any pieces. Have you ever started a project only to realize you lost a small but crucial part? Avoid that hassle by organizing everything now.
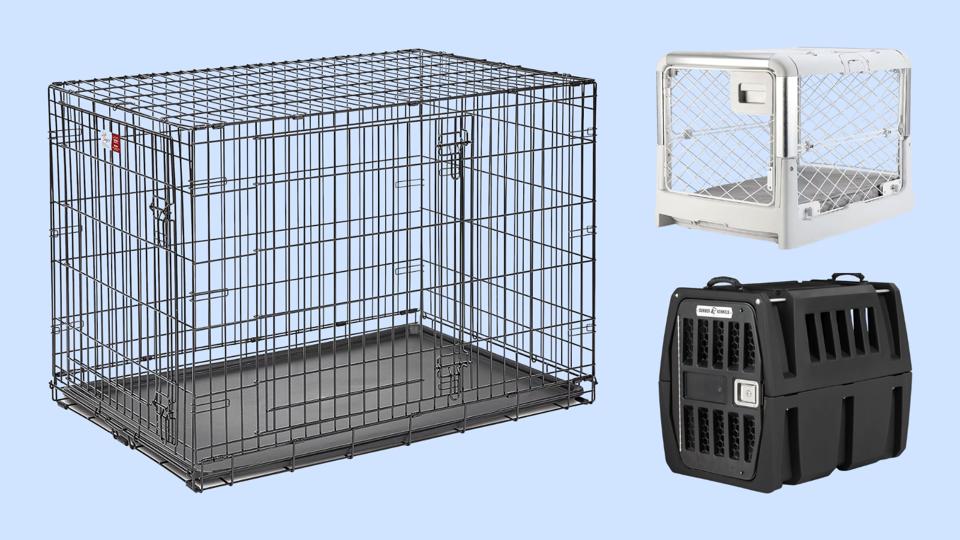
Identify Crate Type
Before you start taking apart your dog crate, it’s important to identify what type of crate you have. Each type has its own design and disassembly process. Knowing this helps you avoid damage and makes the task much easier.
Wire Crates
Wire crates are made with metal bars and usually fold flat for storage. They often have hinges and clips that hold the panels together. Look for simple latches or pins that you can release to separate the sides.
These crates may have a removable plastic tray at the bottom. Removing this tray first gives you better access to the frame. Have you checked if the crate folds or requires complete disassembly?
Plastic Crates
Plastic crates come in two halves joined by screws or clips. They often have ventilation holes and a door on one side. Identify if your crate uses screws or snap-in clips before trying to take it apart.
Sometimes, the top and bottom are held together by bolts that need a screwdriver or wrench. Keep track of all hardware as you remove it. Have you gathered the right tools for this kind of crate?
Soft-sided Crates
Soft-sided crates are made of fabric stretched over a collapsible frame. These usually zip open or fold down without tools. Check for zippers, Velcro, or folding joints to collapse the crate.
Since these crates are flexible, avoid pulling too hard on the frame. Have you inspected the seams and fasteners to ensure smooth folding?

Credit: www.msn.com
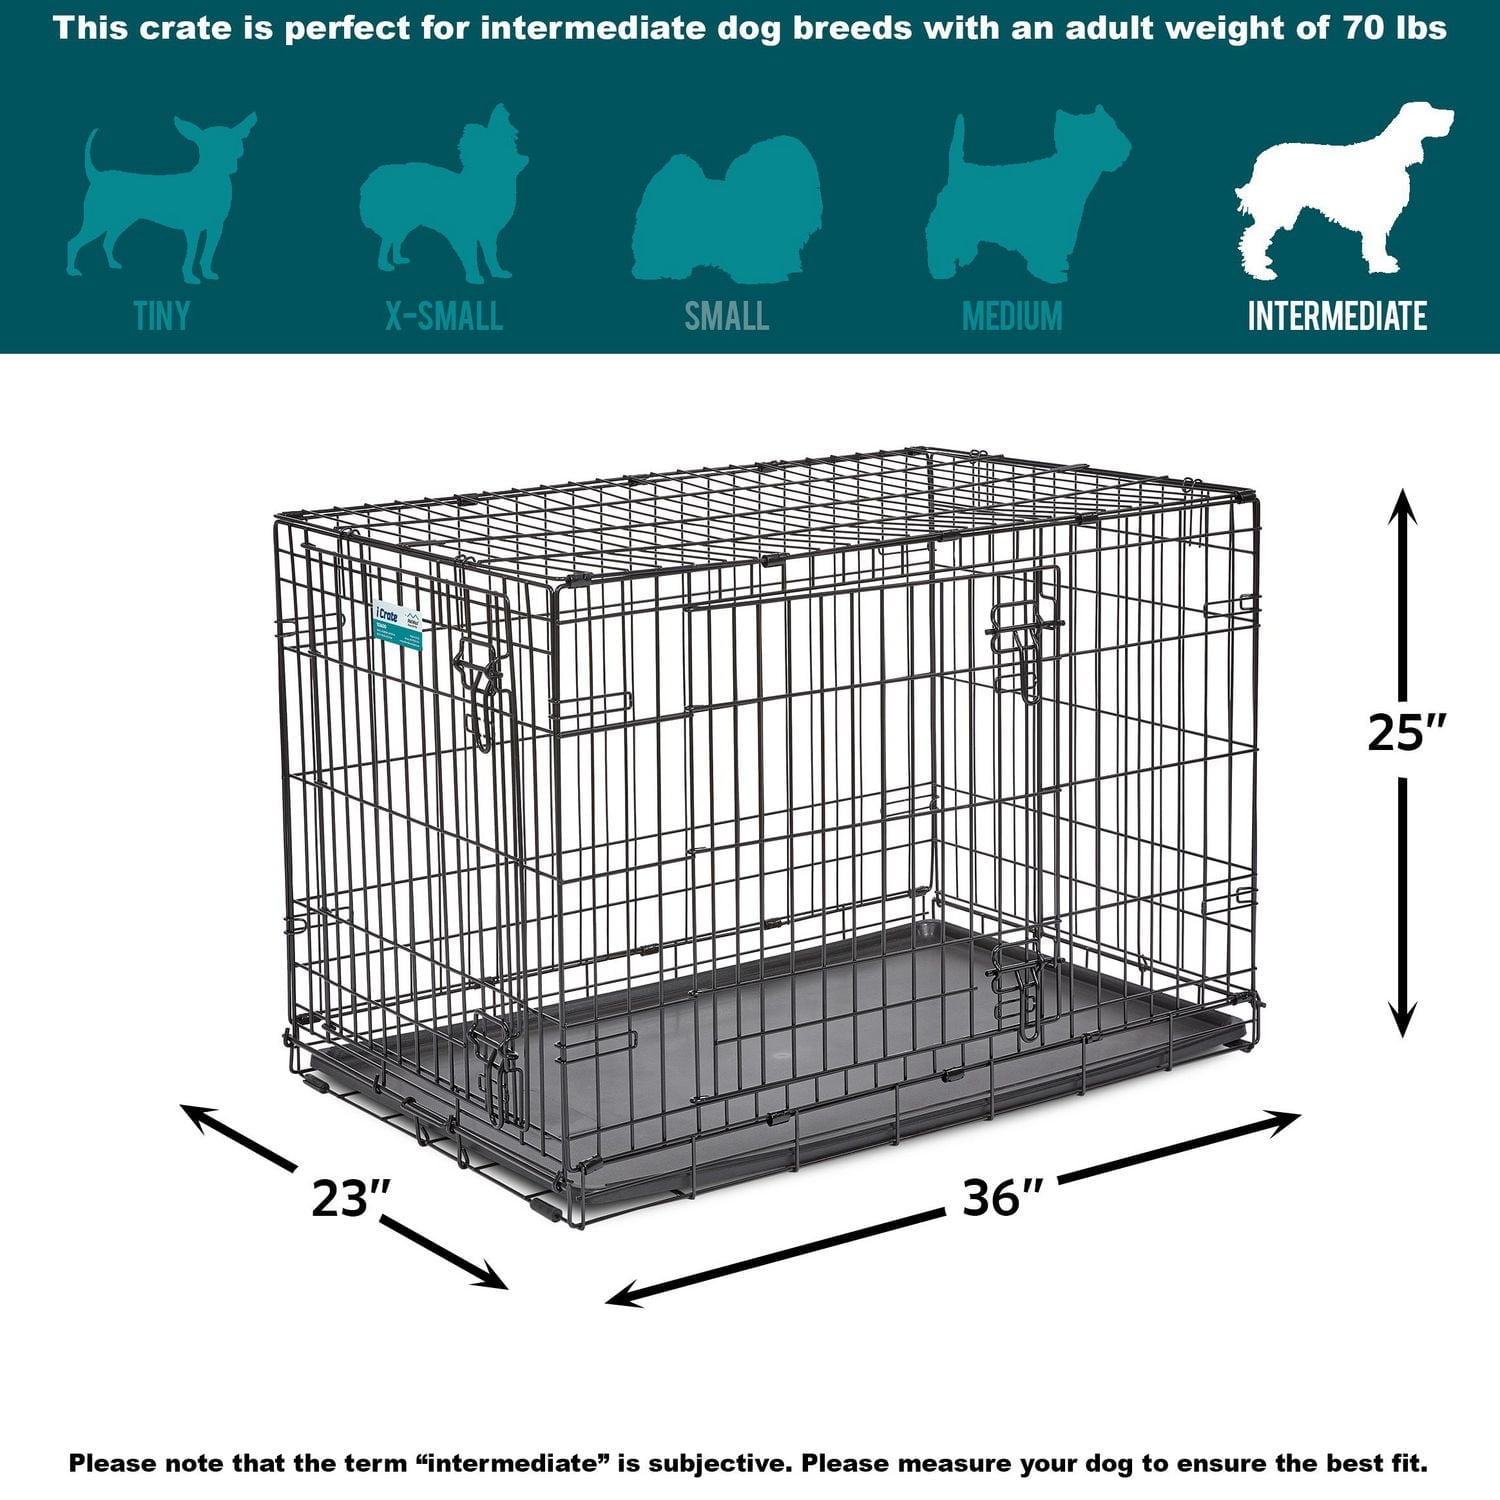
Disassemble Wire Crates
Begin by opening all the crate doors and removing any bedding or toys. Carefully unlock each latch or clip, then gently separate the panels. Keep screws or small parts safe for easy reassembly later.
Taking apart a wire dog crate may seem daunting at first, especially if you’re doing it for the first time. However, with the right approach, it can be a straightforward task. By focusing on key areas such as unlatching the doors, detaching panels, and removing the base, you can efficiently disassemble your crate without hassle.Unlatch Doors
The first step is to unlatch the doors. Most wire crates come with a latch mechanism that secures the doors. Gently lift the latch and swing the door open. If you find it sticking, a little wiggle might help. Have you ever noticed how a simple act of opening something can feel rewarding? That’s what unlatching the door will feel like once you get the hang of it.Detach Panels
Next, focus on detaching the panels. These are usually connected with hooks or clips. Carefully unhook or unclip these to start separating the panels. It’s like solving a puzzle; each piece has its place and method of removal. Keep an eye on any small parts that might fall off during this process. It’s easy to misplace them, and they are crucial for reassembling the crate.Remove Base
Finally, remove the base. The base often slides out once the panels are detached. Simply pull it out and set it aside. If you’ve ever tried to fit a large piece into a small space, you’ll appreciate the simplicity of sliding the base out. Consider how each piece fits together as you disassemble. This understanding will make reassembly much easier when the time comes. Remember, disassembling a wire crate is not just about taking it apart, but also about preparing to put it back together. Each step you take now will save you time and effort later.Disassemble Plastic Crates
Disassembling plastic dog crates is simple with the right approach. These crates usually have parts that snap or screw together. Taking them apart carefully helps avoid damage and makes storage or cleaning easier.
Unclip Side Panels
Plastic crates often use clips to hold side panels in place. Start by finding these clips along the edges. Gently press or pull the clips to release the panels. Avoid forcing them to prevent cracks or breaks.
Separate Top And Bottom
The top and bottom parts of plastic crates usually fit snugly together. Look for latches or tabs holding them. Lift or press these to separate the two sections. Set them aside carefully to keep them intact.
Handle Fasteners
Check for screws, bolts, or plastic fasteners securing the crate. Use a screwdriver or your hands to remove these fasteners. Keep all pieces together to avoid losing small parts during reassembly.
Disassemble Soft-sided Crates
Disassembling a soft-sided dog crate is simple and quick. These crates are designed to fold flat for easy storage and travel. Understanding how to take them apart helps keep the crate in good condition. It also makes cleaning easier and saves space.
Unzip And Fold
Start by unzipping all the doors and windows. This frees the fabric from tension and makes folding easier. Lay the crate flat on a clean surface. Gently fold the sides inward, flattening the crate step by step. Avoid forcing the fabric to prevent damage.
Remove Frame Poles
Soft-sided crates usually have removable frame poles inside. Find the poles running along the crate’s edges. Carefully slide each pole out from its sleeve or clip. Keep the poles together to avoid losing any parts. Removing the poles helps the crate fold completely flat.
Safety Tips
Taking apart a dog crate requires care to avoid accidents. Safety should be your top priority during the process. Small parts and sharp edges can cause injuries if you are not careful. Use the right tools and follow safe handling practices.
Keep your workspace clear and organized. This reduces the chance of tripping or losing important pieces. Protect your hands with gloves to avoid cuts. Always keep children and pets away from the area while disassembling the crate.
Wear Protective Gloves
Gloves protect your hands from sharp metal or plastic edges. They also improve your grip on small parts. Choose sturdy gloves that fit well for better control.
Work In A Clear Space
A tidy area prevents accidents and lost pieces. Remove obstacles and clutter around you. Good lighting helps you see screws and hinges clearly.
Use Proper Tools
Select the right screwdriver or wrench for screws and bolts. Avoid makeshift tools that can slip or damage parts. Check tools before use to ensure they are in good condition.
Keep Pets And Children Away
Dogs and kids should stay out of the work zone. Small parts could be swallowed or cause harm. A quiet, separate room works well for disassembly.
Handle Parts Carefully
Metal edges may be sharp and cause cuts. Move slowly and avoid rushing. Place removed parts on a flat surface to prevent damage or loss.
Credit: www.walmart.ca
Storage And Transport
Proper storage and transport of your dog crate parts prevent damage and make future assembly easier. Organizing each component carefully helps save space. Protecting fragile pieces keeps your crate in good shape.
Pack Components
Gather all crate parts in one place. Group similar pieces together, such as panels and screws. Use clear plastic bags for small items like bolts and hinges. Label each bag to avoid confusion later. Stack panels flat to prevent bending. Keep doors separate to avoid scratches.
Protect Parts
Wrap delicate parts in soft cloth or bubble wrap. Use old towels or blankets for extra cushioning. Avoid placing heavy objects on top of crate pieces. Store parts in a dry area to prevent rust or mold. Transport crate parts in a sturdy box or container. Secure loose pieces to prevent shifting during travel.
Frequently Asked Questions
How Do I Safely Disassemble A Dog Crate?
To safely disassemble a dog crate, first remove any bedding and accessories. Then, carefully undo the latches or screws holding the panels together. Follow the manufacturer’s instructions if available, and keep all parts organized to avoid losing pieces during reassembly.
What Tools Are Needed To Take Apart A Dog Crate?
Common tools include a screwdriver, pliers, and sometimes a wrench. Some crates use clips or latches that don’t require tools. Always check your crate’s design before starting to ensure you have the correct tools on hand for easy disassembly.
Can I Reuse My Dog Crate After Taking It Apart?
Yes, most dog crates are designed to be reassembled and reused. Keep all parts and hardware safe and undamaged. Properly stored, your crate can be reassembled anytime for travel, training, or temporary use.
How Long Does It Take To Take Apart A Dog Crate?
Disassembling a dog crate usually takes between 10 to 30 minutes. The time depends on crate size and complexity. Having the right tools and instructions ready helps speed up the process efficiently.
Conclusion
Taking apart a dog crate can be simple and quick. Follow the steps carefully to avoid damage. Keep screws and parts in one place to find them easily. Use basic tools like a screwdriver for best results. Work slowly and check each piece as you go.
This way, you can put the crate back together or store it safely. Remember, patience helps you finish the task without stress. Now, you are ready to handle your dog crate with confidence.

Emily Barker is the founder of ChillDogLife.com, a space dedicated to helping pup parents discover the best dog products, lifestyle tips, and cozy ideas for happier homes.
A lifelong dog lover, Emily combines her passion for pets with a knack for research to share trusted recommendations on everything from toys and furniture to health and everyday care.
Her goal is simple: to make life easier, stylish, and more joyful for dogs and the people who love them.